This guide provides clear, step-by-step instructions on how to replace the Control Panel. With our user-friendly setup, anyone can complete the installation with ease—no technical expertise required. Follow along to start playing workouts right away!
In this guide, you’ll find:
1. Overview of Package Components:
A breakdown of each component included in your package.
2. Installing the Control Panel
1. Overview of Package Components:
Here’s a simplified explanation of each component included in your package.
Control Panel ProDVX TMP-22
- The control panel allows you to select and control workouts or virtual classes. You can pause, fast-forward, or stop sessions directly from this device.

Power Cable 12V:

Part 2 - Installation - Control Panel
1. Open the Casing:
Unlock the 22" casing using the provided keys.
2. Prepare the Wall for Mounting:
- Remove the backplate from the casing.
- Mark the 4 mounting holes on the wall where the backplate will be installed.
- Insert 4 screws into the wall, but do not fully tighten them yet.

Tip: Use a Spirit Level

3. Attach the Backplate:
- Position the backplate onto the screws.
- Use a spirit level to make sure the backplate is straight.
- Once aligned, securely tighten the screws.
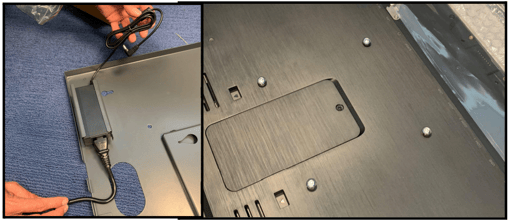
4: Inserting the Power Supply
-
Insert the Power Supply:
Place the power supply (packed together with the display) into the backplate of the casing. -
Secure the Display:
Insert the 4 bolts that come with the casing into the corresponding screw threads on the back of the display.
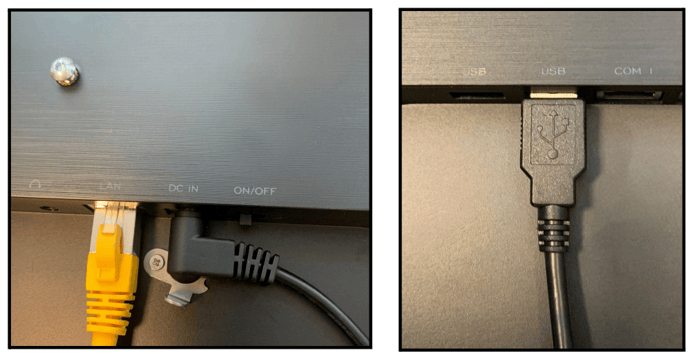
5: Connect the Cables
-
Network Connection:
Insert the network cable into the port labeled "LAN" on the touchscreen. -
Power Connection:
Plug the 12V power cable from the included power supply into the port marked "DC IN" on the display. -
RFID Reader Connection:
Insert the USB cable from the RFID reader into the USB port on the display.
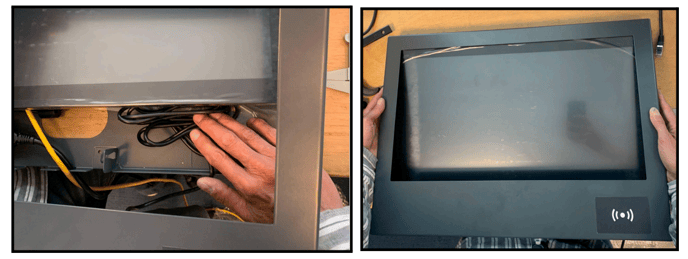
6: Cable Routing:
Make sure that the main power cable and the network cable run out of the casing through the designated hole at the bottom.
-
Connect to Power and Network:
- Plug the power cable into an electrical outlet.
- Connect the network cable to an RJ45 wall outlet with internet access.
Tip: If using a recessed mount or hollow wall, you can drill a hole at the backplate's recess to keep power and network connections hidden.
7: Mount the Display on the Backplate
- Place the display onto the backplate, securing it with the 4 bolts inserted earlier.

8: Organize Cables:
Ensure cables are neatly arranged to allow the casing to close easily.
9: Close and Mount:
- Close the casing securely.
- Mount the casing onto the wall using the 4 screws.
Done! If you have any question, please click here to fill out a quick form, and we’ll get back to you as soon as possible!