This guide provides clear, step-by-step instructions for integrating the virtual player (VP) into your studio. With our user-friendly setup, anyone can complete the installation with ease—no technical expertise required. Follow along to start playing workouts right away!
In this guide, you’ll find:
1. Overview of Package Components:
A breakdown of each component included in your package.
2. What's NOT included on the set:
A list of essential tools and cables needed to set up your Virtual Player.
3. Installation of the Virtual Player
This section is divided into two parts:
-
Part 1: Installing the Control Panel
Step-by-step instructions for installing the Control Panel. -
Part 2: Installing the Brightsign
A detailed guide to set up the Brightsign device to complete your installation.
1. Overview of Package Components:
Here’s a simplified explanation of each component included in your package.
ProDVX TMP-22 Control Panel:
- The control panel allows you to select and control workouts or virtual classes. You can pause, fast-forward, or stop sessions directly from this device.

BrightSign Media Player HD224:
- This device is responsible for downloading and streaming fitness content such as workouts and virtual classes.
- It handles both downloading content and executing commands issued through the control panel.

Power Cable 12V:

2. What's NOT included on your set 
- TV Screen with HDMI port
- Ethernet cable
- HDMI cable
- Electric drill
- Screws and wall plugs suitable for the wall type
- Spirit level
- Hand tools
Part 3.1 - Installation of the Virtual Player
1. Open the Casing:
Unlock the 22" casing using the provided keys.
2. Prepare the Wall for Mounting:
- Remove the backplate from the casing.
- Mark the 4 mounting holes on the wall where the backplate will be installed.
- Insert 4 screws into the wall, but do not fully tighten them yet.

Tip: Use a Spirit Level

3. Attach the Backplate:
- Position the backplate onto the screws.
- Use a spirit level to make sure the backplate is straight.
- Once aligned, securely tighten the screws.
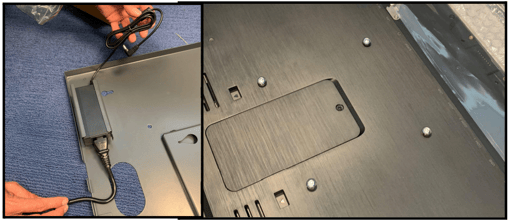
4: Inserting the Power Supply
-
Insert the Power Supply:
Place the power supply (packed together with the display) into the backplate of the casing. -
Secure the Display:
Insert the 4 bolts that come with the casing into the corresponding screw threads on the back of the display.
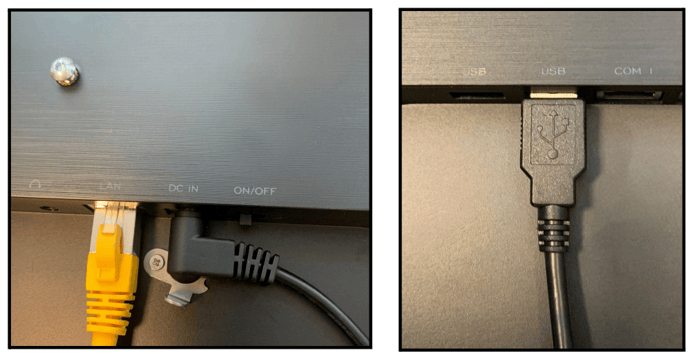
5: Connect the Cables
-
Network Connection:
Insert the network cable into the port labeled "LAN" on the touchscreen. -
Power Connection:
Plug the 12V power cable from the included power supply into the port marked "DC IN" on the display. -
RFID Reader Connection:
Insert the USB cable from the RFID reader into the USB port on the display.
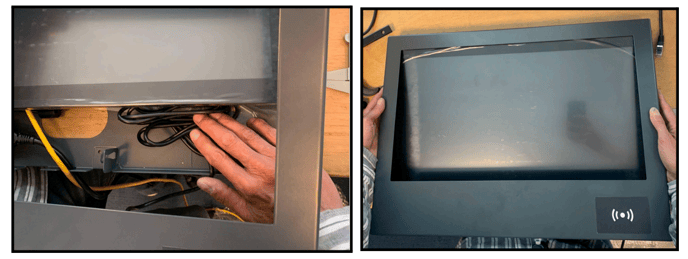
6: Cable Routing:
Make sure that the main power cable and the network cable run out of the casing through the designated hole at the bottom.
-
Connect to Power and Network:
- Plug the power cable into an electrical outlet.
- Connect the network cable to an RJ45 wall outlet with internet access.
Tip: If using a recessed mount or hollow wall, you can drill a hole at the backplate's recess to keep power and network connections hidden.
7: Mount the Display on the Backplate
- Place the display onto the backplate, securing it with the 4 bolts inserted earlier.

8: Organize Cables:
Ensure cables are neatly arranged to allow the casing to close easily.
9: Close and Mount:
- Close the casing securely.
- Mount the casing onto the wall using the 4 screws.
Congratulations! The Virtual Player setup is complete. Now, let's proceed with installing the BrightSign Media Players.
Step 3.2 - Connecting the BrightSign Media Player:
-
Power Connection:
Connect each BrightSign Media Player to a power outlet using its power adapter. -
Ethernet Connection:
Connect an Ethernet cable to the BrightSign Media Player. -
HDMI Connection:
Insert an HDMI cable into each BrightSign Media Player and connect it to the respective screen. -
Power On:
Turn on the BrightSign players and ensure the TV screens are set to the correct input/source.
.jpg?width=526&height=526&name=Beige%20Black%20Flat%20Illustrative%20Business%20Brand%20Typography%20Logo%20(1).jpg)
If everything is set up correctly and the internet connection is established, commands from the command post will be executed by the BrightSign players. If the class isn't available immediately, it may need time to download from our server.
If you have any question, please click here to fill out a quick form, and we’ll get back to you as soon as possible!
